# Online Sales
## Introduction
Online Sales (previously Custome on the Website Chekcout Page and App-to-App) allows you to:
* Generate a one-time usage digital QR code and show it on your website’s check out page. Your consumers scan the QR code with their preferred payment application and confirm the transaction.
* Initiate a one-time-use payment request directly within your mobile checkout experience.
When consumers confirm their purchase, they are seamlessly redirected via a universal deeplink to their preferred mobile payment application to authorize the transaction. After completing the payment, users are automatically redirected back to your app or mobile site to view the payment confirmation and finalize the purchase journey.
Online Sales can be used with Bancontact Payconiq's checkout page or your own. Online Sales payment requests are valid for **twenty minutes** (1200 seconds).
## Process Flow
The following section outlines the key steps involved in a Online Sales online payment with Bancontact Payconiq. The process involves several key parties, each playing a specific role in completing the transaction.
### Prerequisites
* **API Key** – This is used to secure the request between the **Merchant’s backend** and **Bancontact Payconiq’s backend**. Do not share your API keys in public areas such as online sites or client-side code.
* **Merchant CallbackUrl** – This URL will be called by Bancontact Payconiq’s backend servers in order to send the status of the payment to the merchant.
* **Merchant ReturnUrl** – This is the URL to which your consumers will be redirected after payment completion.
### Involved Parties
The following parties participate in a display-based in-store payment with Bancontact Payconiq:
* **Payer Application**: The consumer's preferred payment app used to complete the transaction.
* **Merchant Frontend**: Your website's checkout page or your Merchant App or your mobile website's checkout page.
* **Merchant Backend**: The merchant’s server-side system that integrates with Bancontact Payconiq.
* **Bancontact Payconiq Backend**: The backend system responsible for handling payment processing and integration services.
## Step-by-Step Payment Flow
Online Sales product can be used either for E-Commerce or M-Commerce (Previously "Custom on the Website Checkout Page" and "App to App")
### E-Commerce
This section outlines a typical **“E-Commerce”** in-store payment flow using Bancontact Payconiq. The process begins when the transaction is initiated at the merchant’s location and ends when both the merchant and the consumer receive the final confirmation.
This product contains two distinct flows: one with your own checkout page, one with Bancontact Payconiq's checkout page.
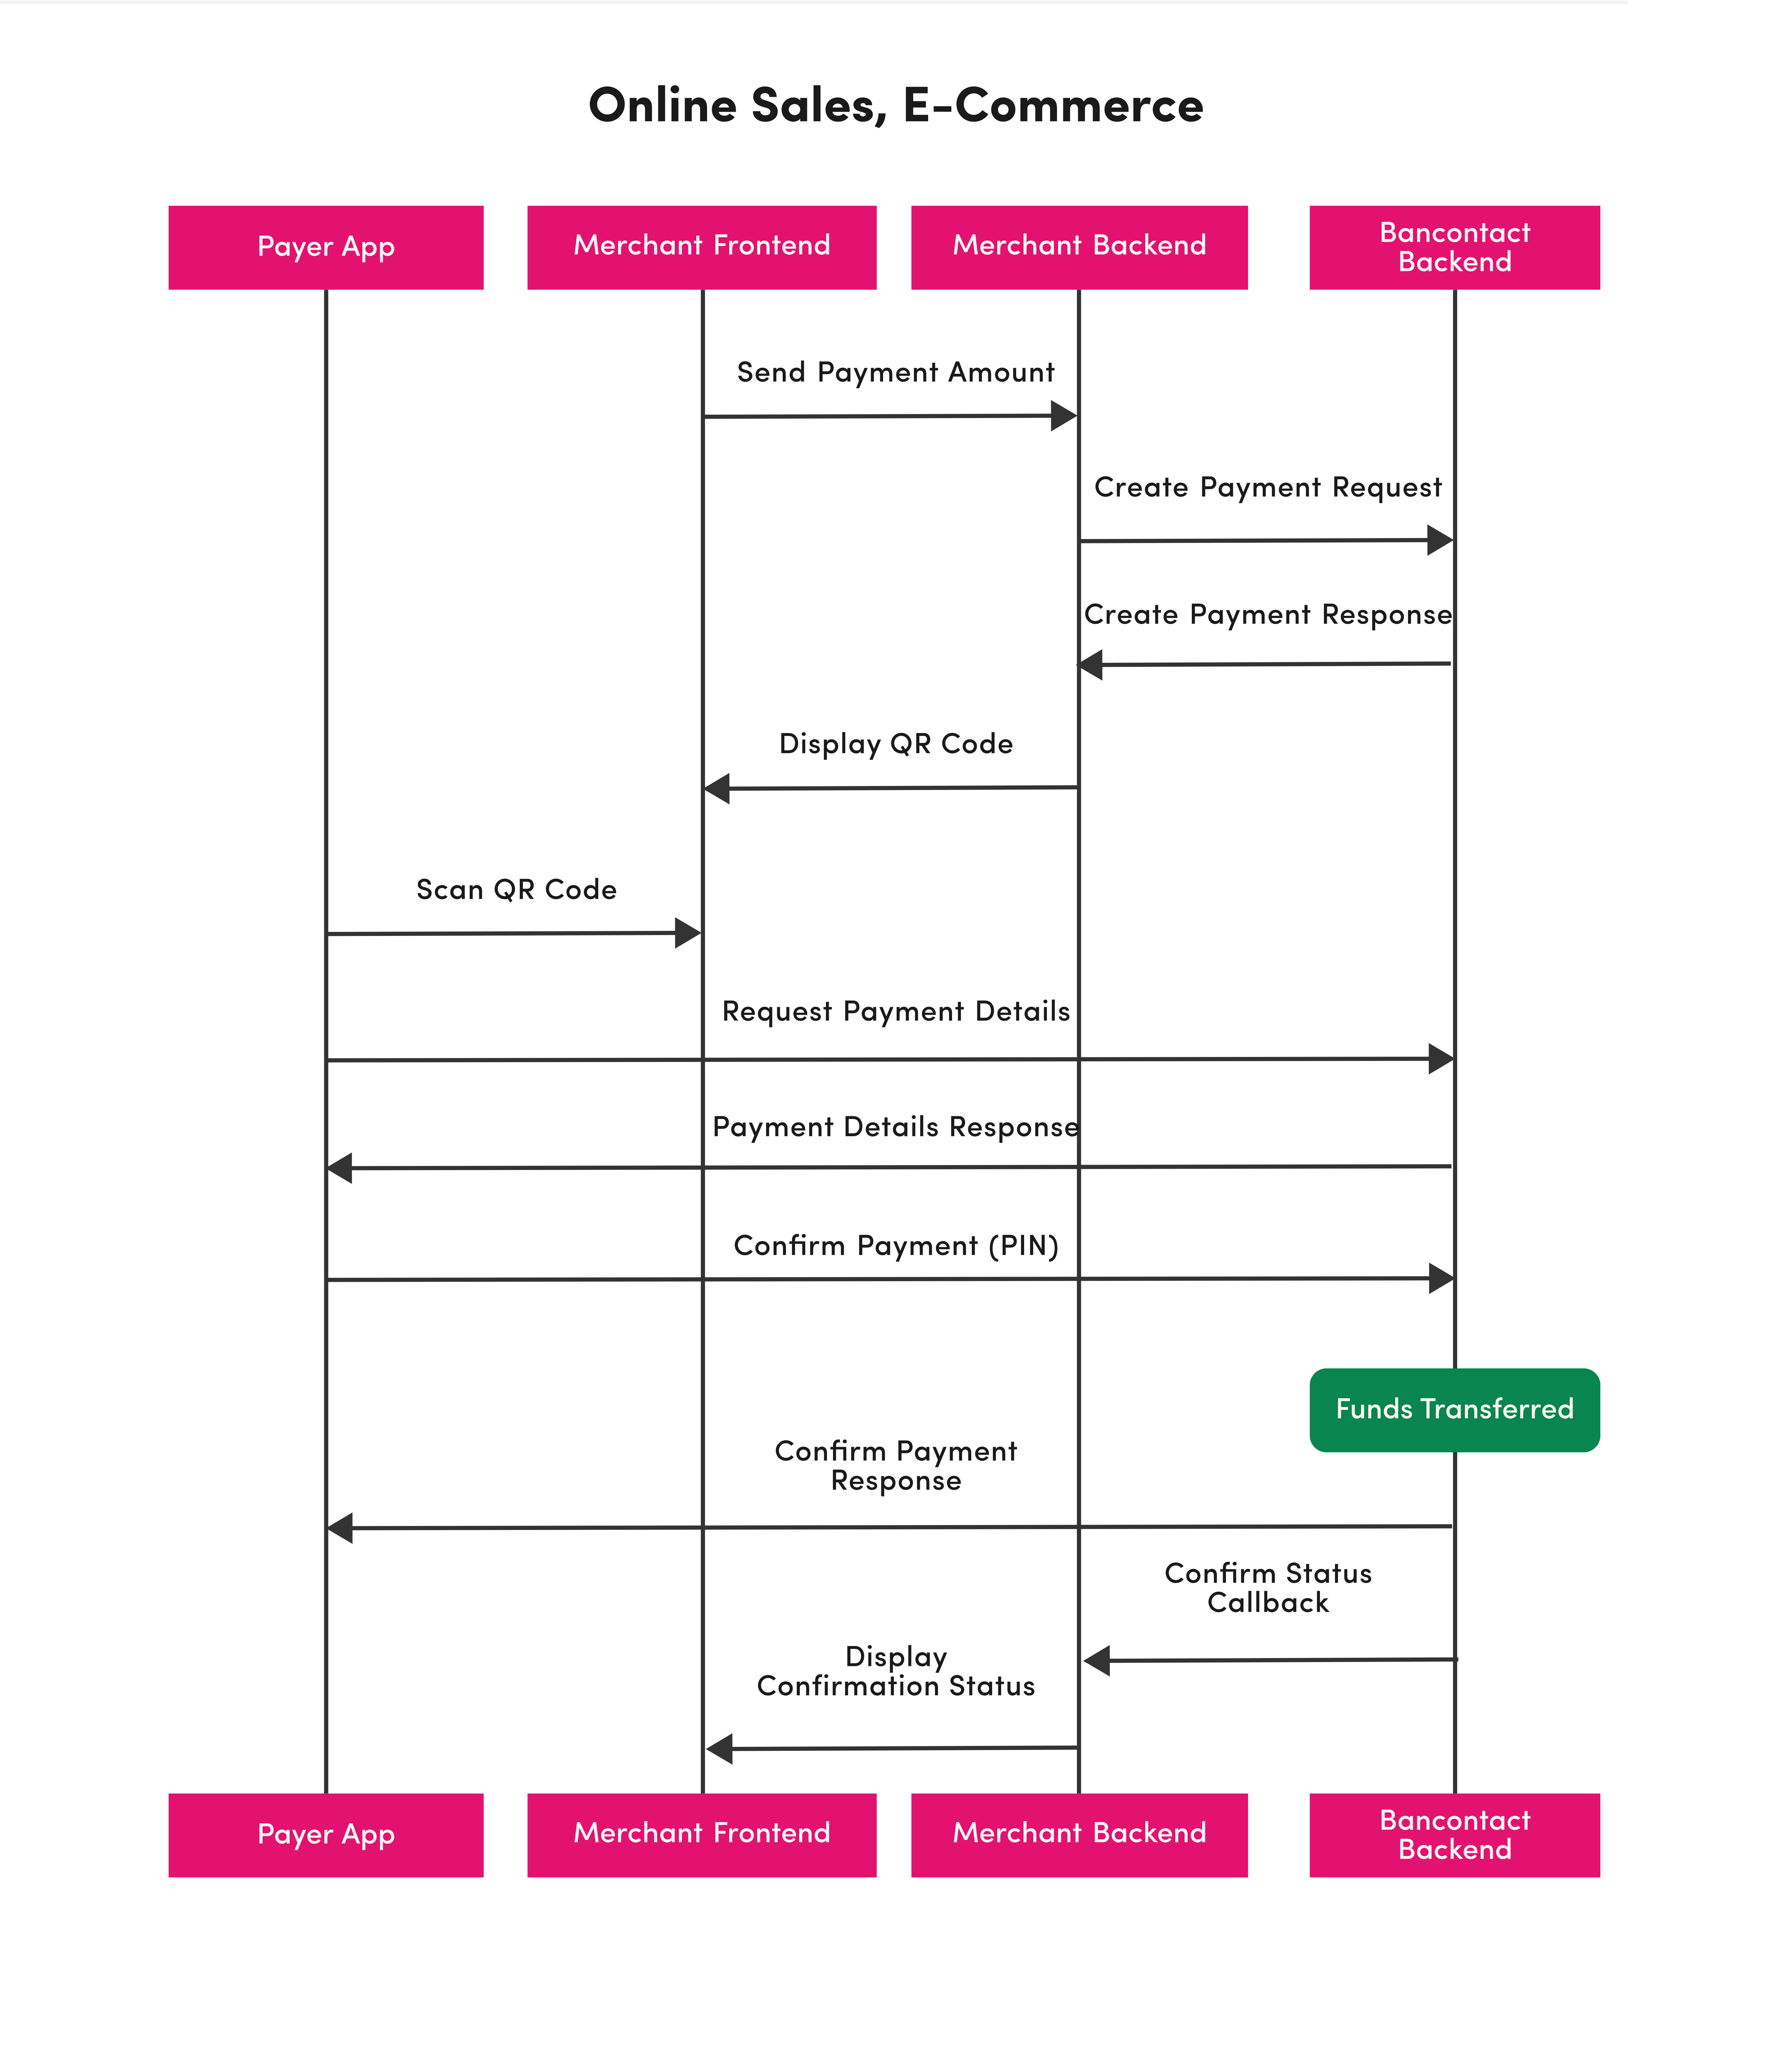
#### Merchant's Checkout Page
* The **merchant frontend** sends payment creation details to the **merchant backend**. Request should at least contain the payment amount.
* The **merchant backend** issues a REST request to the **Bancontact Payconiq backend** to create the payment, providing parameters like amount, currency, description, and other relevant parameters.
* The **Bancontact Payconiq backend** responds with the created payment ID and other relevant details, including a unique **QR code URL**.
* The **merchant backend** forwards the QR code URL to the **merchant frontend**, which displays it for the consumer.
* The **merchant backend** sends the QR Code url to the **merchant frontend** to render the payment as a QR Code.
* The **Payer app** scans the QR code and sends a request to retrieve payment details from the backend.
* The **Bancontact Payconiq backend** sends payment details to the **Payer App**, including merchant name and amount to pay.
* The consumer confirms the payment using PIN, fingerprint, or face ID. The app then submits the payment request to the backend for authorization.
* A payment response is sent back to the **Payer App**, indicating whether the payment was successful or failed.
* The **Bancontact Payconiq backend** sends a payment notification with the payment status to the **merchant backend** via the configured callback URL.
* The **merchant frontend** displays the payment confirmation status.
> **Important Note:** The order in which the merchant and consumer receive payment status notifications is **not guaranteed**. Network and connectivity differences may cause one party to receive the update before the other.
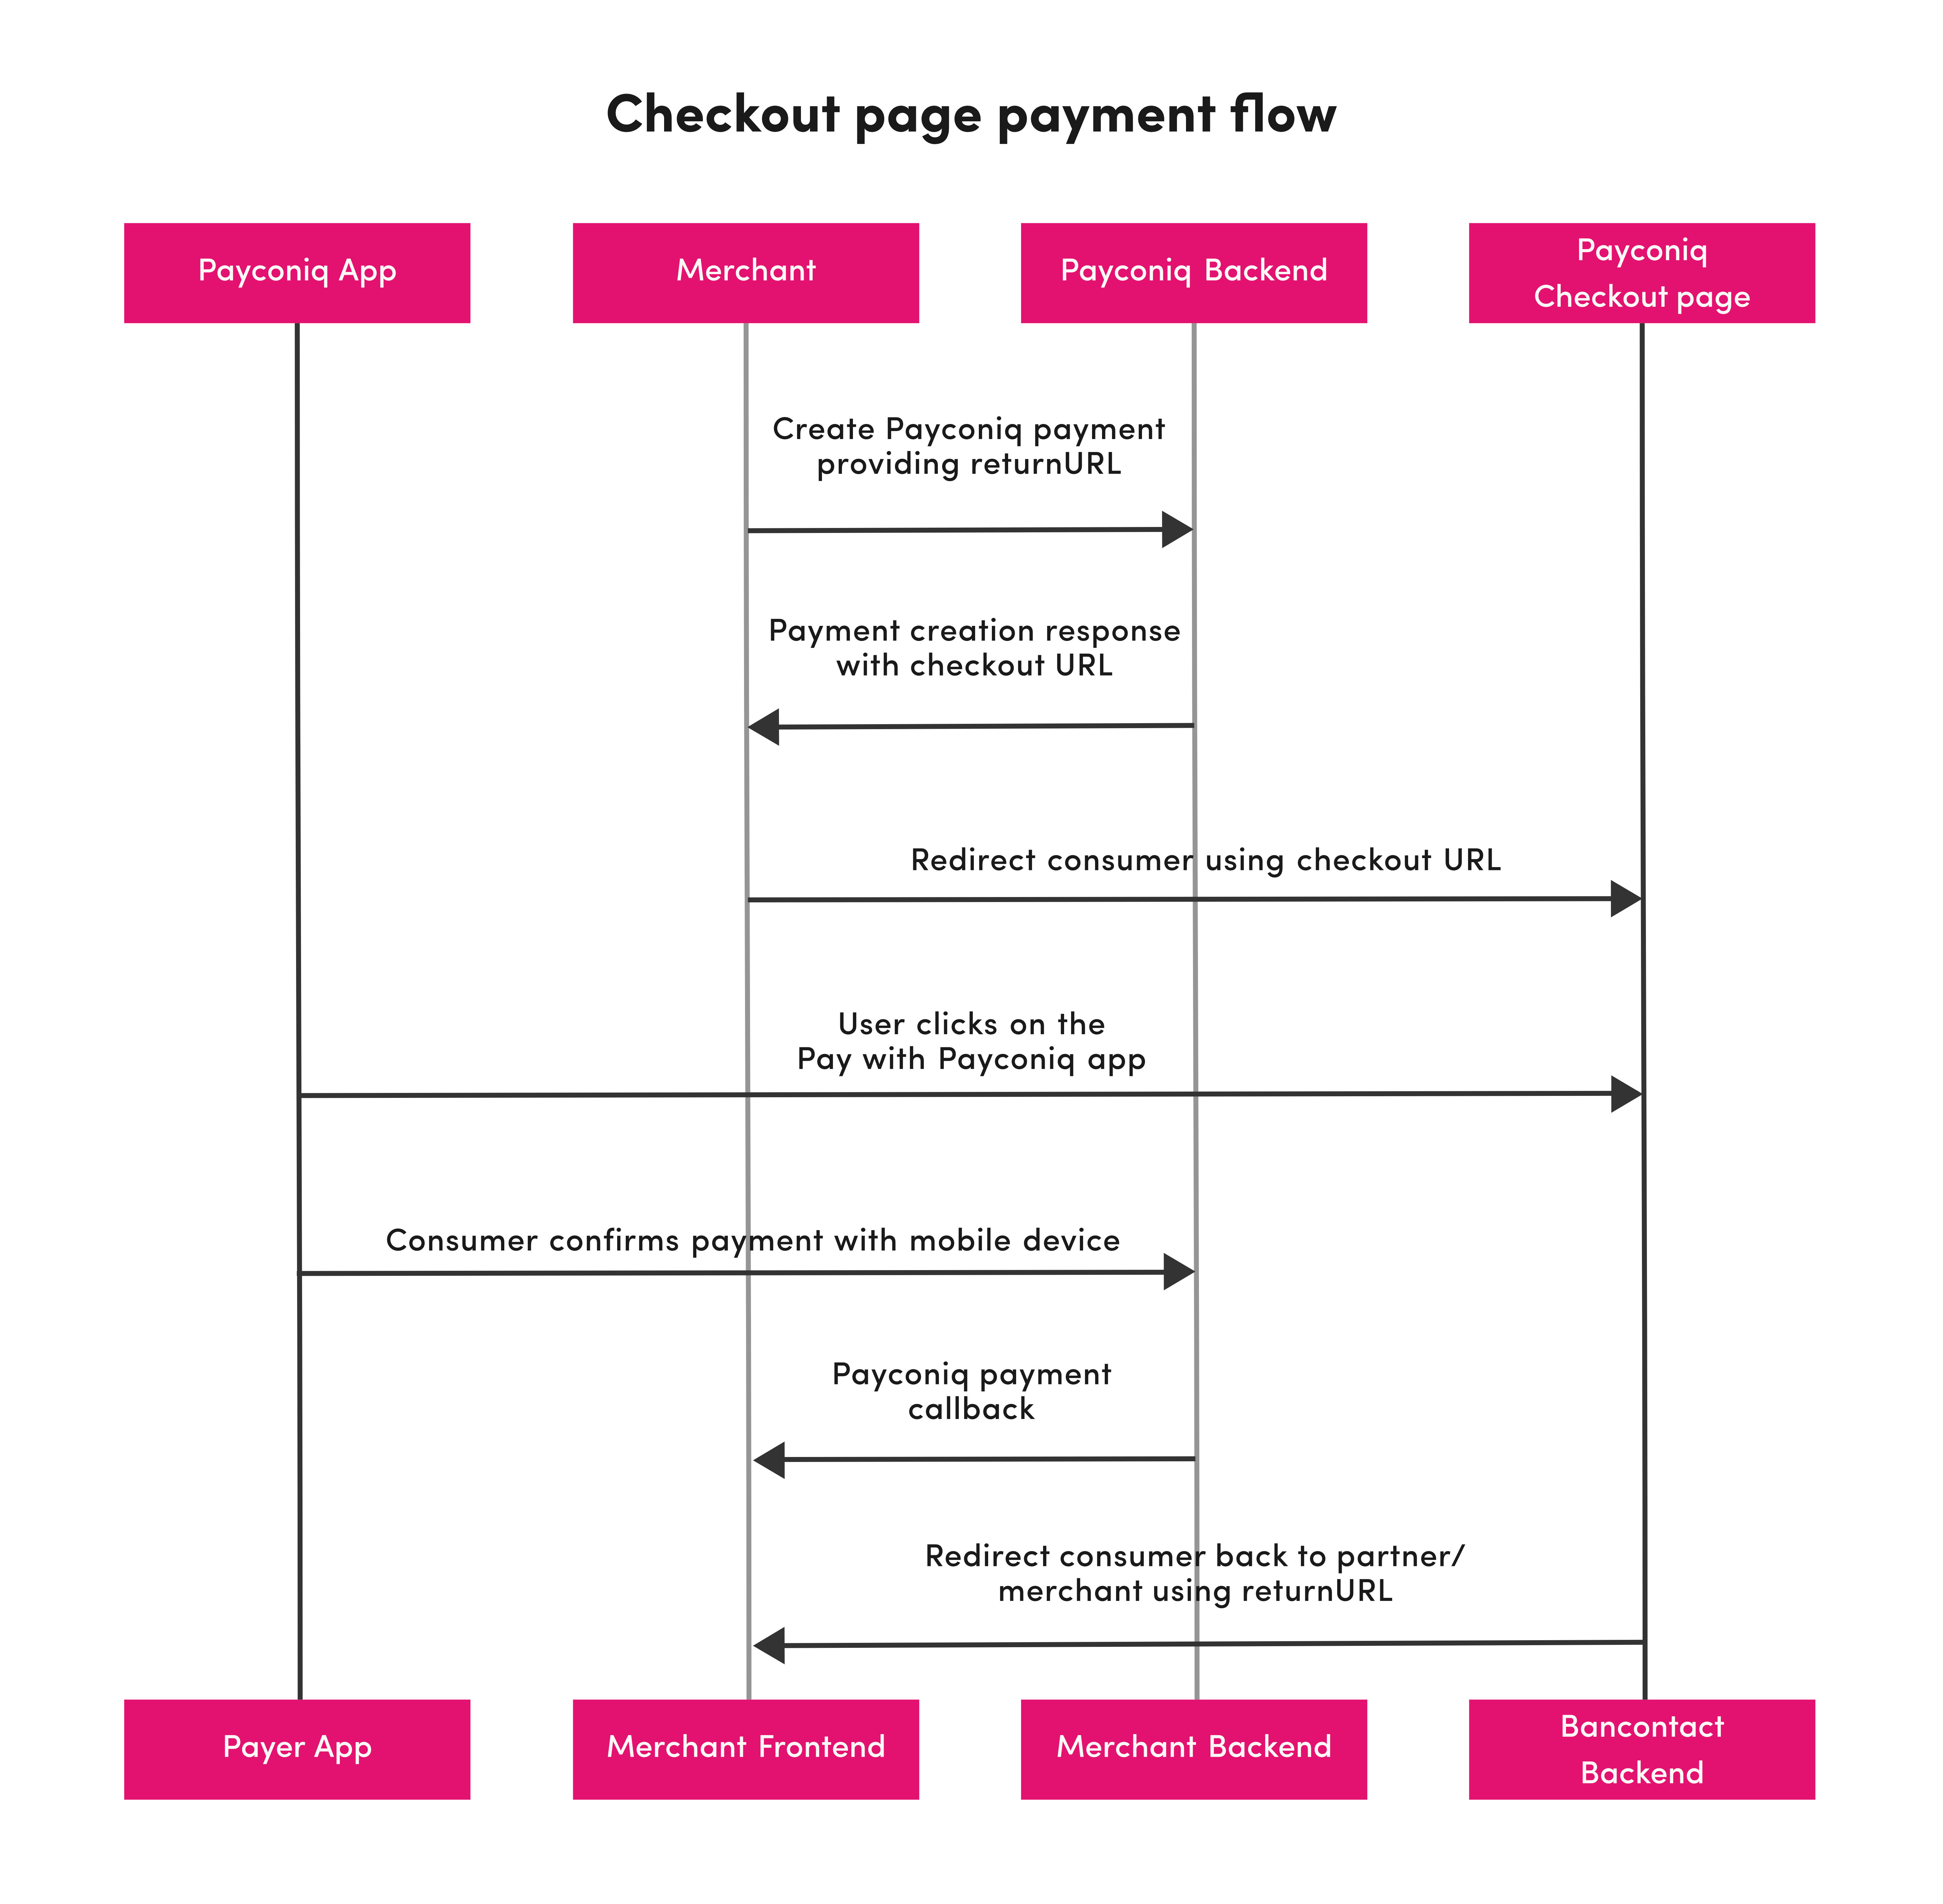
#### Bancontact Payconiq's Checkout Page
* The **merchant frontend** sends payment creation details to the **merchant backend**. Request should at least contain the payment amount.
* The **merchant backend** issues a REST request to the **Bancontact Payconiq backend** to create the payment, providing parameters like amount, currency, description, and other relevant parameters.
* The **Bancontact Payconiq backend** responds with the created payment ID and other relevant details, including a **checkout URL link**.
* The **merchant backend** redirects the consumer to Bancontact Payconiq's checkout page using checkout url provided in response from the previous step.
* The **merchant backend** forwards the QR code URL to the **merchant frontend**, which displays it for the consumer.
* The **merchant backend** sends the QR Code url to the **merchant frontend** to render the payment as a QR Code.
* The **Payer app** scans the QR code and sends a request to retrieve payment details from the backend.
* The **Bancontact Payconiq backend** sends payment details to the **Payer App**, including merchant name and amount to pay.
* The consumer confirms the payment using PIN, fingerprint, or face ID. The app then submits the payment request to the backend for authorization.
* A payment response is sent back to the **Payer App**, indicating whether the payment was successful or failed.
* The Bancontact Payconiq checkout page e redirects the consumer back to returnURL provided by the merchant during payment creation.
* The **Bancontact Payconiq backend** sends a payment notification with the payment status to the **merchant backend** via the configured callback URL.
* The **merchant frontend** displays the payment confirmation status.
> **Important Note:** The order in which the merchant and consumer receive payment status notifications is **not guaranteed**. Network and connectivity differences may cause one party to receive the update before the other.
### M-Commerce
This section outlines a typical **“M-Commerce”** in-store payment flow using Bancontact Payconiq.
The process begins when the transaction is initiated at the merchant’s location and ends when both the merchant and the consumer receive the final confirmation.
To achieve this, you will have to use the `_links.deeplink.href` received in the `Create Payment` response.
Simply append your returnURL to create a universal link.
* The **merchant app** or mobile website sends payment creation details to the **merchant backend**. Request should at least contain the payment amount.
* The **merchant backend** issues a REST request to the **Bancontact Payconiq backend** to create the payment, providing parameters like amount, currency, description, and other relevant parameters.
* The **Bancontact Payconiq backend** responds with the created payment ID and other relevant details, including **several links**.
* The **merchant backend** forwards the payment ID and the deeplink link to the **merchant app** or mobile website.
* The **merchant app** or mobile website adds a returnURL to the deeplink to create a universal link.
* The **merchant app** or mobile website executes the universal link to invoke the payer app.
* The **payer app** sends a request to retrieve payment details from **the Bancontact Payconiq backend**.
* The **Bancontact Payconiq backend** sends payment details to the **Payer App**, including merchant name and amount to pay.
* The consumer confirms the payment using PIN, fingerprint, or face ID. The app then submits the payment request to the backend for authorization.
* A payment response is sent back to the **Payer App**, indicating whether the payment was successful or failed.
* The **Bancontact Payconiq backend** sends a payment notification with the payment status to the **merchant backend** via the configured callback URL.
* The **Payer app** returns the consumer to the **merchant app** by invoking the specified returnURL.
* The **merchant app** or mobile website displays the payment confirmation status.
> **Important Note:** The order in which the merchant and consumer receive payment status notifications is **not guaranteed**. Network and connectivity differences may cause one party to receive the update before the other.
**The Bancontact Payconiq Fallback**
In certain instances, consumers may be redirected to a Bancontact Payconiq page asking them to dowload a payer app, even if the user already has one.
If this happens your consumers may be blocked in the flow and be unable to procede to payment.
To circunvent this, you can use the checkout URL (`_links.checkout.href`) received in the `create payment` response instead of creating your own universal link.
By doing so, your consumers will either be redirected to the payer app to complete the payment, or to the Bancontact Payconiq fallback page, from where they'll be
able to select one of their installed apps to complete the payment.
## Payment Flow Diagrams
In the following diagrams you will find a visual overview of the process flows presented above:
### E-Commerce, Merchant's Checkout Page
### E-Commerce, Bancontact Payconiq's Checkout Page
### M-Commerce
img
### M-Commerce, Bancontact Payconiq Fallback
img
## Implementation Guide
Please follow the below steps to successfully implement the Payconiq API on your website.
### 1. Create Payment
In order to initiate a payment, you will first have to create it through Bancontact Payconiq via a **POST** request.
Each request will result in a unique payment identifier which will be valid for **twenty minutes (1200 seconds)**.
If the payment does not take place within these two minutes, a new payment must be created.
#### 📦 Request Body
#### 📥 Response
#### 🔧 Error Codes for `create`
| HTTP Status | Code | Meaning |
| --- | --- | --- |
| 400 | `BODY_MISSING` | A json needs to be provided |
| 400 | `FIELD_IS_REQUIRED` | Field X is mandatory |
| 400 | `FIELD_IS_INVALID` | Field X is invalid |
| 401 | `UNAUTHORIZED` | user doesn’t have an access token |
| 403 | `ACCESS_DENIED` | The JWT could not be verified (different format) - The JWT doesn’t contain the required authority to access the resource requested |
| 404 | `MERCHANT_PROFILE_NOT_FOUND` | The merchant profile does not exist |
| 422 | `UNABLE_TO_PAY_CREDITOR` | Variable reason(Depends on automatic processing). |
| 500 | `TECHNICAL_ERROR` | Technical error in Payment service |
| 503 | `TRY_AGAIN_LATER` | one of the internal services is unavailable |
#### 🔍 Sample Request – `create payment`
### 2.1 The Bancontact Payconiq QR Code (E-Commerce)
To display the Bancontact Payconiq QR code, you can render the URL from the attribute `_links.self.href` received in the Create Payment reponse in a web view. By doing so, you'll make use of Bancontact Payconiq's QR code generation service and will generate by default a small, magenta QR code (cf. Brand Guidelines).
**Important:** the format, size and colour of the QR code can be modified if necessary using the parameters below. Please make sure to read our Brand Guidelines for more guidance on the minimum sizes and scanning distances.
| **Attribute** | **Description** |
| --- | --- |
| `f` [String :: Enum] Allowed Values: SVG, PNG | Image format |
| `s` [String :: Enum] Allowed Values: S, M, L, XL | Image size of the QR code to generate. Small (S) = 180x180 Medium (M) = 250x250Large (L) = 400x400 Extra Large (XL) = 800x800 The sizes only applies to PNG format. |
| `cl` [String :: Enum] Allowed Values: magenta, black | The colour of the QR code. Default is magenta. |
### 2.2 Invoking the Bancontact Payconiq Universal Link (M-Commerce)
M-Commerce can be set-up either for App-to-App payments or Mobile Browser to App payments.
Please follow the intructions bellow accordingly.
#### App-to-App
The following parameters are used to invoke the Payconiq.
| Attribute | Description |
| --- | --- |
| `_links.deeplink.href` [String :: URI] | URL String used to perform App2App linking |
| Return Url [String:: URI] | A url to which the Merchant will be notified of a payment. Must be Https for production. |
p
For further information on implementing universal links on
a
iOS
and/or
a
Android
,
please follow the attached links.
##### iOS
```swift
/* Create Payconiq payment */
let createdPayment = createPayconiqPayment(amount: paymentAmount, "description": paymentDescription, "reference": paymentReference, "currency": paymentCurrency, "callbackUrl": paymentCallbackUrl)
//Get deeplink url from created payment
let deeplinkUrl = createdPayment.deeplinkUrl
//Specify return url
let returnUrl = "?returnUrl=https://example.com"
//Start the Payconiq Application
if let url = URL(deeplinkUrl + returnUrl) {
if #available(iOS 10.0, *) {
// Pass custom options if needed
UIApplication.shared.open(url, options: [:], completionHandler: { result in
//Handle result
})
}else {
let result = UIApplication.shared.openURL(url)
//Handle result
}
}
```
##### Android
```java
// Create a Payconiq Payment
PayconiqPayment createdPayment = createPayconiqPayment(amount, description, reference, currency, callbackUrl);
//Get the deeplink url from the created payment
String deeplinkUrl = createdPayment.getDeeplinkUrl();
// Construct the universal link
String returnUrl = "https://example.com/";
String universalLink = String.format(deeplinkUrl + "?returnUrl=%s", returnUrl);
// Start the Payconiq application
startActivity(new Intent(Intent.ACTION_VIEW, Uri.parse(universalLink)));
```
#### Mobile Browser to App
The set-up for Mobile Browsers is almost the same as App-to-App. However, you will also
have to introduce the following logic in your mobile website in order to determine the OS
phone used for payment and either fire a Bancontact Payconiq URL for iOS, or an intent for Android.
##### iOS
Introduce this function to identify an iOS device
```
function isIOS() {
if (/iphone|XBLWP7/i.test(navigator.userAgent.toLowerCase())) {
return true;
} else {
return false;
}
}
```
Trigger the payer app with the following code sample:
```
```
##### Android
Introduce this function to identify an Android device:
```
function isAndroid() {
if (/android|XBLWP7/i.test(navigator.userAgent.toLowerCase())) {
return true;
} else {
return false;
}
}
```
Trigger the payer app with the following code sample:
```
```
### 3. The Bancontact Payconiq Callback
You can specify a callback URL where the **Bancontact Payconiq backend** will send notifications about the status of a payment. This will allow you to take appropriate action and process the payment data.
The **merchant backend** must verify that the notification message originated from **Bancontact Payconiq backend** was not altered or corrupted during the tranmission. To do so, please ensure signature validation.
> For the full Callback documentation, please refer to the [Callback Guide](/guides/general/callback052025).
#### 📦 Request Body
#### 📥 Response
*(No defined response schema)*
#### 🔍 Sample Request – `callback`
#### Callback Failure
In the event you do not receive a callback or the callback validation fails, please refer to **"4. Get Payment Details"**. This alternative will also allow you to confirm the status of a transaction in order to complete the payment.
### 4. Get Payment Details
By calling this endpoint you can obtain the details of an existing payment transaction by passing the unique payment ID.
**Note:** it is highly recommended to implement this call as a fallback option if callback fails.
#### 🧩 Path Parameters
- `id` *(string, required)*
#### 📥 Response
#### 🔧 Error Codes for `merchant-get-payment`
| HTTP Status | Code | Meaning |
| --- | --- | --- |
| 401 | `UNAUTHORIZED` | caller doesn’t have an api-key access token |
| 403 | `ACCESS_DENIED` | api-key access token is invalid, creditor it's not a participant of the requested payment |
| 404 | `PAYMENT_NOT_FOUND` | no payment could be found |
| 500 | `TECHNICAL_ERROR` | Technical error in Payment service |
#### 🔍 Sample Request – `merchant-get-payment`
### 5. Get Payment List
You can also retrieve a list of payments by specifying how many records to return, as well as a filter on the results for the total number of records returned per page.
#### 📦 Request Body
#### 📥 Response
#### 🔧 Error Codes for `search`
| HTTP Status | Code | Meaning |
| --- | --- | --- |
| 401 | `UNAUTHORIZED` | caller doesn’t have an api-key access token |
| 403 | `ACCESS_DENIED` | api-key access token is invalid, creditor it's not a participant of the requested payment |
| 500 | `TECHNICAL_ERROR` | Technical error in Payment service |
#### 🔍 Sample Request – `search`
## Canceling a Payment
Endpoint `delete-payment` can be used to cancel a created payment that is still in status `PENDING`.
The endpoint can also be used to cancel a payment in `IDENTIFIED` status, as long as the consumer has
not initiated payment confirmation.
### 🧩 Path Parameters
- `id` *(string, required)* — Payconiq Payment Id
### 🔧 Error Codes for `delete-payment`
| HTTP Status | Code | Meaning |
| --- | --- | --- |
| 401 | `UNAUTHORIZED` | user doesn't have an access token |
| 403 | `ACCESS_DENIED` | access token is invalid |
| 403 | `CALLER_NOT_ALLOWED_TO_CANCEL` | if caller is not a participant of the payment |
| 404 | `PAYMENT_NOT_FOUND` | payment is not found in the system |
| 422 | `PAYMENT_NOT_PENDING` | payment is not in pending or identify state |
| 500 | `TECHNICAL_ERROR` | Technical error in Payment service |
### 🔍 Sample Request – `delete-payment`